Come creare un elenco a discesa con caselle di controllo multiple in Excel?
Gli elenchi a discesa tradizionali in Excel consentono all’utente di effettuare una sola selezione. Per superare questo limite e abilitare scelte multiple, esploreremo due metodi pratici per creare elenchi a discesa con caselle di controllo multiple.
Utilizzare una casella di riepilogo per creare un elenco a discesa con caselle di controllo multiple
A: Creare una casella di riepilogo con Dati di origine
B: Assegnare un nome alla cella in cui si troverà il Numero di elementi selezionati
C: Inserire una forma per facilitare l'output del Numero di elementi selezionati
Creare facilmente un elenco a discesa con caselle di controllo grazie a uno strumento sorprendente
Altri tutorial sugli elenchi a discesa...
Utilizzare una casella di riepilogo per creare un elenco a discesa con caselle di controllo multiple
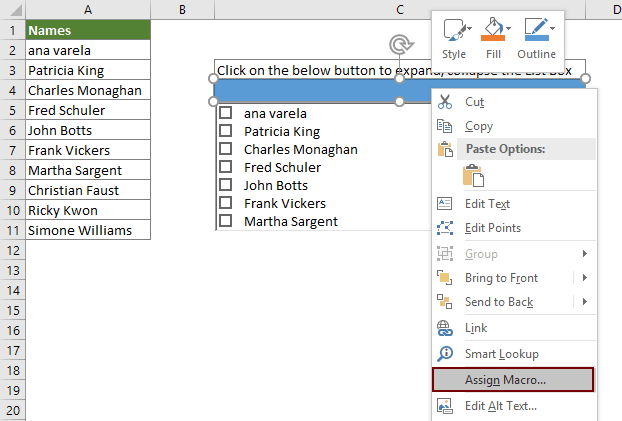
Come illustrato nello screenshot seguente, tutti i nomi compresi nell’intervallo A2:A11 del foglio di lavoro corrente fungeranno da dati di origine per la casella di riepilogo posizionata nella cella C4. Facendo clic su tale casella, si espande l’elenco degli elementi selezionabili e il numero di elementi scelti viene visualizzato nella cella E4. Per ottenere questo risultato, seguire questi passaggi:

A. Crea una casella di riepilogo utilizzando i Dati di origine
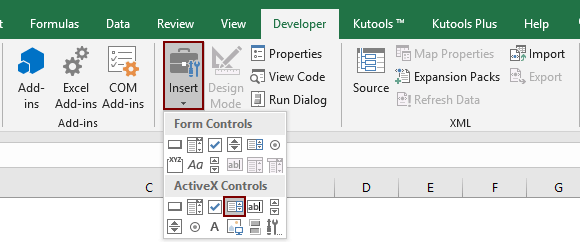
1. Fare clic su Sviluppo > Inserisci > Casella di riepilogo (controllo ActiveX). Vedere lo screenshot:
2. Disegna una casella di riepilogo nel foglio di lavoro corrente, fai clic con il pulsante destro del mouse e seleziona Proprietà dal menu contestuale.

3. Nella finestra di dialogo Proprietà, procedi come segue.
- Nella casella ListFillRange, inserire il Intervallo di origine che verrà visualizzato nell'elenco (qui inserisco l'intervallo)A2:A11);
- Nella casella ListStyle, selezionare 1 - fmListStyleOption;
- Nella casella MultiSelect, selezionare 1 – fmMultiSelectMulti;
- Chiudi la finestra di dialogo Proprietà. Guarda lo screenshot:


B: Assegnare un nome alla cella in cui si troverà il Numero di elementi selezionati
Per visualizzare il numero totale di elementi selezionati in una cella specifica, ad esempio E4, procedere come segue.
1. Seleziona la cella E4, digita ListBoxOutput nella Barra dei nomi e premi il tasto Invio.

C. Inserisci una forma per semplificare l'output del numero di elementi selezionati.
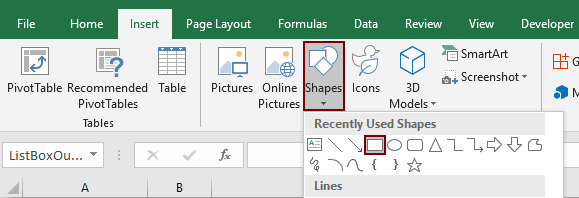
1. Fare clic su Inserisci > Forme > Rettangolo. Vedere lo screenshot:
2. Disegna un rettangolo nel foglio di lavoro (in questo esempio, il rettangolo è stato disegnato nella cella C4). Fai quindi clic con il pulsante destro del mouse sul rettangolo e seleziona Assegna macro dal menu contestuale.
3. Nella finestra di dialogo Assegna macro, fai clic sul pulsante Nuovo.

4. Nella finestra di Microsoft Visual Basic, Applications Edition aperta, sostituisci il codice originale presente nella finestra del Modulo con il seguente codice VBA.
Codice VBA: Creare un elenco con caselle di controllo multiple
Sub Rectangle1_Click()
'Updated by Extendoffice 20200730
Dim xSelShp As Shape, xSelLst As Variant, I, J As Integer
Dim xV As String
Set xSelShp = ActiveSheet.Shapes(Application.Caller)
Set xLstBox = ActiveSheet.ListBox1
If xLstBox.Visible = False Then
    xLstBox.Visible = True
    xSelShp.TextFrame2.TextRange.Characters.Text = "Pickup Options"
    xStr = ""
    xStr = Range("ListBoxOutput").Value

    If xStr <> "" Then
         xArr = Split(xStr, ";")
    For I = xLstBox.ListCount - 1 To 0 Step -1
        xV = xLstBox.List(I)
        For J = 0 To UBound(xArr)
            If xArr(J) = xV Then
              xLstBox.Selected(I) = True
              Exit For
            End If
        Next
    Next I
    End If
Else
    xLstBox.Visible = False
    xSelShp.TextFrame2.TextRange.Characters.Text = "Select Options"
    For I = xLstBox.ListCount - 1 To 0 Step -1
        If xLstBox.Selected(I) = True Then
        xSelLst = xLstBox.List(I) & ";" & xSelLst
        End If
    Next I
    If xSelLst <> "" Then
        Range("ListBoxOutput") = Mid(xSelLst, 1, Len(xSelLst) - 1)
    Else
        Range("ListBoxOutput") = ""
    End If
End If
End Sub
Nota: Nel codice, Rettangolo1 è il nome della forma; CasellaDiRiepilogo1 è il nome della casella di riepilogo; Seleziona Opzioni e Opzioni di selezione sono i testi visualizzati dalla forma; e ListBoxOutput è il nome della cella di output. Puoi modificarli in base alle tue esigenze.
5. Premere contemporaneamente i tasti Alt+Q per chiudere la finestra di Microsoft Visual Basic, Applications Edition.
6. Facendo clic sul pulsante rettangolo, la casella di riepilogo si comprime o si espande. Quando è espansa, seleziona gli elementi desiderati attivando le relative caselle di controllo, quindi fai nuovamente clic sul rettangolo per visualizzare il numero di elementi selezionati nella cella E4. Guarda la demo seguente:
7. Salvare quindi la cartella di lavoro come Cartella di lavoro di Excel con macro abilitate per poter riutilizzare il codice in futuro.
Creare un elenco a discesa con caselle di controllo grazie a uno strumento sorprendente
Stanchi della complessa programmazione VBA? Kutools per Excel rende semplicissimo creare elenchi a discesa con caselle di controllo per una selezione multipla fluida e senza interruzioni. Perfetto per sondaggi, filtri dati o moduli dinamici, questo strumento intuitivo semplifica il tuo flusso di lavoro e ti fa risparmiare tempo prezioso.
1. Apri il foglio di lavoro in cui è stata impostata la convalida dati con elenco a discesa, fai clic su Kutools > Elenco a discesa > Abilita elenco a discesa avanzato. Quindi, fai nuovamente clic su Aggiungi caselle di controllo all'elenco a discesa dal menu Elenco a discesa, ancora . Vedi lo screenshot:
 |  |
2. Nella finestra di dialogo Aggiungi caselle di controllo all'elenco a discesa, procedi come segue.
- 2,1) Selezionare le celle contenenti l'elenco a discesa;
- 2,2) Nella casella Separatore, inserire un delimitatore da utilizzare per separare gli elementi multipli;
- 2,3) Seleziona l'opzione Abilita funzione di ricerca in base alle tue esigenze. (Se selezioni questa opzione, potrai effettuare ricerche nell'elenco a discesa in un secondo momento.)
- 2,4) Fare clic sul pulsante OK.


D’ora in poi, quando si fa clic su una cella con un elenco a discesa, verrà visualizzata una casella di riepilogo: seleziona gli elementi desiderati attivando le relative caselle di controllo per visualizzarli nella cella, come mostrato nella demo seguente.
Per ulteriori dettagli su questa funzionalità, guarda questo tutorial.
Kutools per Excel– Potenzia Excel con oltre 300 strumenti essenziali, rendendo il tuo lavoro più veloce e semplice, e sfrutta le funzionalità basate sull’IA per un’elaborazione dati più intelligente e una maggiore produttività.Scaricalo ora
Questo articolo ti presenta due metodi semplici per creare facilmente un elenco a discesa con caselle di controllo in Excel. Scegli quello che preferisci! Se vuoi scoprire altri suggerimenti e trucchi per Excel, il nostro sito web offre migliaia di tutorial.
Articoli correlati:
Completamento automatico durante la digitazione in un elenco a discesa di Excel
Se hai un elenco a discesa con convalida dati contenente molti valori, devi scorrere l’elenco per trovare quello che ti serve oppure digitare manualmente l’intera parola nella casella. Ma immagina se potessi attivare il completamento automatico semplicemente digitando la prima lettera: tutto diventerebbe molto più veloce e intuitivo! Questo tutorial ti mostra come ottenere proprio questo risultato.
Creare un elenco a discesa da un'altra cartella di lavoro in Excel
Creare un elenco a discesa con la convalida dati tra fogli della stessa cartella di lavoro è abbastanza semplice. Ma se i dati necessari per la convalida si trovano in un’altra cartella di lavoro, come si fa? In questo tutorial scoprirai passo dopo passo come creare un elenco a discesa da un’altra cartella di lavoro in Excel.
Creare un elenco a discesa ricercabile in Excel
Quando un elenco a discesa contiene numerosi valori, trovare quello giusto non è affatto semplice. In passato abbiamo già illustrato un metodo per attivare il completamento automatico dell’elenco digitando la prima lettera nella casella. Oltre a questa funzione, puoi rendere l’elenco a discesa direttamente ricercabile, per individuare i valori desiderati in modo ancora più rapido ed efficiente. Scopri come fare con il metodo spiegato in questo tutorial!
Compila automaticamente altre celle quando selezioni un valore da un elenco a discesa in Excel
Immagina di aver creato un elenco a discesa basato sui valori nell’intervallo B8:B14. Quando selezioni un elemento dall’elenco, vorresti che il valore corrispondente nell’intervallo C8:C14 venga inserito automaticamente in una cella specifica. I metodi illustrati in questo tutorial ti aiuteranno a ottenere esattamente questo risultato.
Migliori Strumenti per la Produttività in Office
Potenzia le tue competenze in Excel con Kutools per Excel e sperimenta un’efficienza mai vista prima.Kutools per Excel offre oltre 300 funzionalità avanzate per aumentare la produttività e Risparmia tempo.Clicca qui per ottenere la funzionalità di cui hai più bisogno...
Office Tab Porta l'interfaccia a schede in Office e rende il tuo lavoro molto più semplice
- Abilita la modifica e la lettura a schede in Word, Excel, PowerPoint, Publisher, Access, Visio e Project.
- Apri e crea più documenti in nuove schede all’interno della stessa finestra, invece che in finestre separate.
- Aumenta la tua produttività del 50 % e risparmia centinaia di clic del mouse ogni giorno!
Tutti i componenti aggiuntivi di Kutools in un unico programma di installazione.
Kutools for Office è la suite che include componenti aggiuntivi per Excel, Word, Outlook e PowerPoint, oltre a Office Tab Pro: la soluzione ideale per i team che lavorano su diverse app di Office.
- Suite completa— componenti aggiuntivi per Excel, Word, Outlook e PowerPoint + Office Tab Pro
- Un unico programma di installazione, una sola licenza— configurazione in pochi minuti (pronto per MSI)
- Funziona meglio insieme— produttività ottimizzata tra le app di Office
- Prova gratuita di 30 giorni con tutte le funzionalità— nessuna registrazione, nessuna carta di credito
- Miglior rapporto qualità-prezzo— risparmia rispetto all’acquisto dei singoli componenti aggiuntivi