Come impostare automaticamente il campo Bcc per tutte le email inviate da Outlook?
Quando si lavora con la posta elettronica in Outlook, può capitare di dover includere costantemente un destinatario segreto — ad esempio un supervisore, un altro account personale o per scopi di archiviazione — in ogni messaggio inviato, senza che gli altri destinatari ne siano a conoscenza. La funzione standard Ccn (Copia carbone nascosta) permette di aggiungere tali destinatari “invisibili”, assicurando che i loro indirizzi rimangano nascosti agli altri destinatari. Tuttavia, il flusso di lavoro integrato di Outlook richiede di mostrare manualmente il campo Ccn e di inserire l’indirizzo email del destinatario desiderato ogni volta che si invia un messaggio. Questo ripetuto passaggio manuale può risultare noioso e soggetto a errori, soprattutto per chi deve utilizzare frequentemente lo stesso indirizzo Ccn. Per semplificare il processo, l’impostazione automatica del Ccn per tutte le email in uscita può far risparmiare tempo e garantire coerenza. L’articolo seguente presenta soluzioni dettagliate per attivare automaticamente il Ccn in Outlook e ne evidenzia vantaggi, utilizzi pratici e aspetti da tenere presenti.
- Impostazione predefinita di BCC Automatico in Outlook tramite VBA
- BCC Automatico in Outlook tramite Kutools per Outlook
Impostazione predefinita di BCC Automatico in Outlook tramite VBA
Outlook non include un’impostazione integrata per aggiungere automaticamente un destinatario in Ccn a ogni email inviata. Tuttavia, grazie a VBA (Visual Basic for Applications), è possibile creare una regola personalizzata che inserisca automaticamente un indirizzo specifico nel campo Ccn di tutti i messaggi in uscita. Questa soluzione offre agli utenti avanzati il massimo controllo, ma richiede una configurazione attenta e particolare attenzione ai messaggi di sicurezza.
Scenari applicabili: Ideale per utenti a proprio agio con la modifica dell’editor di script di Outlook e che cercano una soluzione universale e automatica per il Ccn, indipendentemente dal tipo di account o dalle condizioni del messaggio. Questo metodo non richiede componenti aggiuntivi esterni ed è compatibile con tutte le versioni standard di Outlook.
Limitazioni: L’approccio VBA non è supportato ufficialmente su Outlook per il Web (Outlook Online), sulle versioni per Mac o sui dispositivi mobili. Le macro potrebbero essere disabilitate in alcuni ambienti aziendali a causa di rigorose politiche di sicurezza. Inoltre, il codice va aggiornato ogni volta che l’indirizzo Ccn cambia e potrebbe andare perso dopo determinati aggiornamenti o reinstallazioni di Outlook.
È possibile utilizzare il seguente codice VBA per impostare una regola automatica di Ccn in Outlook. Segui attentamente questi passaggi:
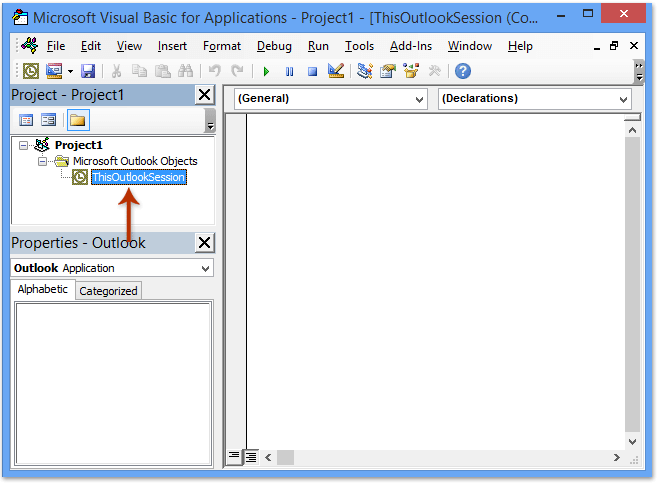
1. Premere contemporaneamente Alt+F11 per aprire la finestra di Microsoft Visual Basic for Applications.
2. Nel riquadro Progetto a sinistra, fai doppio clic su ThisOutlookSession per aprire la relativa finestra del codice. Incolla quindi il codice VBA riportato di seguito in tale finestra. Consulta l’immagine per una guida visiva:
Codice VBA: BCC Automatico all’invio di tutte le email
Private Sub Application_ItemSend(ByVal Item As Object, Cancel As Boolean)
Dim objRecip As Recipient
    Dim strMsg As String
    Dim res As Integer
    Dim strBcc As String
    On Error Resume Next

    ' #### USER OPTIONS ####
    ' address for Bcc -- must be SMTP address or resolvable
    ' to a name in the address book
    strBcc = "SomeEmailAddress@domain.com"

    Set objRecip = Item.Recipients.Add(strBcc)
    objRecip.Type = olBCC
    If Not objRecip.Resolve Then
        strMsg = "Could not resolve the Bcc recipient. " & _
                 "Do you want still to send the message?"
        res = MsgBox(strMsg, vbYesNo + vbDefaultButton1, _
                 "Could Not Resolve Bcc Recipient")
        If res = vbNo Then
            Cancel = True
        End If
    End If

    Set objRecip = Nothing
End Sub
Spiegazione dei parametri e suggerimenti pratici:
Sostituisci "SomeEmailAddress@domain.com" nel codice con l’indirizzo email specifico a cui desideri inviare ogni copia Ccn. Puoi indicare un singolo destinatario, un gruppo o persino un account alternativo, qualora richiesto per motivi di conformità o archiviazione. Utilizza un formato email valido e verifica attentamente l’inserimento per evitare l’inoltro accidentale di informazioni sensibili.
3. Fai clic su File > Salva nell’editor VBA, quindi chiudi la finestra di Microsoft Visual Basic for Applications.
Una volta attivato il codice, ogni email inviata tramite Outlook desktop (Windows) includerà automaticamente il destinatario Ccn specificato, senza alcun intervento manuale: non sarà più necessario aprire il campo Ccn né reinserire l’indirizzo. Questa soluzione è ideale per garantire tracce di audit o per assicurare sempre una copia silente in ottemperanza ai requisiti di conformità.
Precauzioni e risoluzione dei problemi:
• Le macro devono essere abilitate in Outlook affinché la funzione operi correttamente. Se lo script non viene eseguito, controlla le impostazioni di sicurezza delle macro nel “Centro protezione”.
• Potrebbero apparire alcuni avvisi di sicurezza all’invio delle email dopo aver abilitato le macro: si tratta di messaggi standard progettati per proteggere il tuo ambiente.
• Per assicurarti che la macro venga eseguita automaticamente al riavvio di Outlook, salvala in “ThisOutlookSession”.
• Se il Ccn non viene aggiunto, verifica che l’indirizzo email sia privo di errori di battitura e che le impostazioni delle macro di Outlook consentano l’esecuzione di codice firmato.
• Ricordati di aggiornare o rimuovere il codice se non desideri più inviare il Ccn allo stesso destinatario.
• Gli script VBA sono compatibili solo con le versioni desktop di Outlook per Windows e non funzionano nell’app Web di Outlook né su Mac.
BCC Automatico in Outlook tramite Kutools per Outlook
Sebbene la soluzione VBA offra un approccio programmatico, potrebbe risultare complessa o poco pratica per chi non ha dimestichezza con gli script o per gli utenti che operano in ambienti in cui le macro sono limitate. Per un metodo più intuitivo e flessibile, Kutools per Outlook offre una soluzione grafica e facile da usare, che permette di impostare automaticamente il Ccn per tutte o solo per alcune email in uscita, grazie a criteri semplici da configurare—senza alcuna necessità di programmazione.
Dì addio all’inefficienza di Outlook! Kutools per Outlook semplifica l’elaborazione batch delle email – e ora puoi provarlo gratis per 30 giorni!Scarica subito Kutools per Outlook!!
Dopo aver installato Kutools per Outlook, seguire questi passaggi per impostare automaticamente il Ccn per tutte le email inviate:
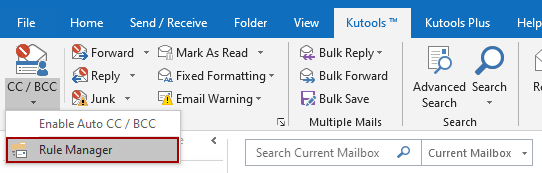
1. In Outlook, fai clic sulla scheda Kutools, scegli CC / BCC Automatico e poi seleziona Gestisci regole dal menu a discesa. Si aprirà così la finestra di gestione delle regole.
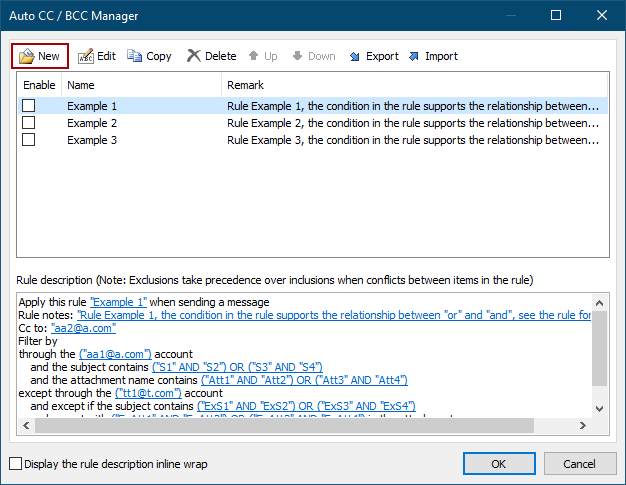
2. Nella finestra di dialogo Gestione Auto CC/BCC, fai clic sul pulsante Nuovo per iniziare a creare una nuova regola.
3. Nella finestra di dialogo Guida per le regole, definisci le condizioni alle quali applicare il Ccn. Ad esempio, puoi selezionare «con parole specifiche nel corpo» per limitare la regola a determinati tipi di email oppure lasciare tutti i criteri deselezionati per applicarla a ogni messaggio inviato. Per specificare una condizione, fai clic sul testo sottolineato (ad esempio «parole specifiche») e inserisci i dettagli richiesti.

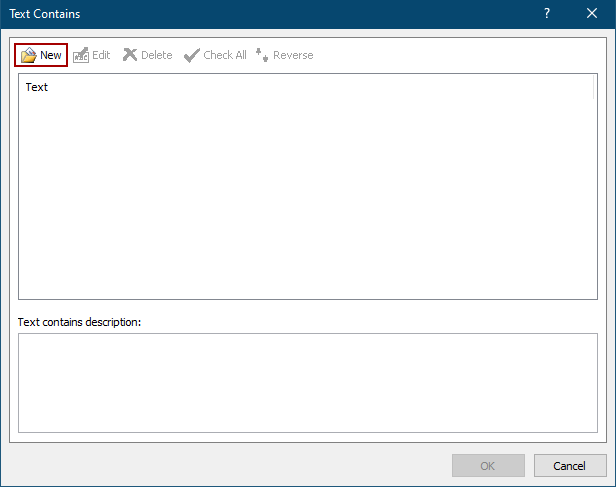
4. Nella finestra di dialogo Testo contiene, fai clic sul pulsante Nuovo per aggiungere ogni parola o frase da utilizzare come condizione.
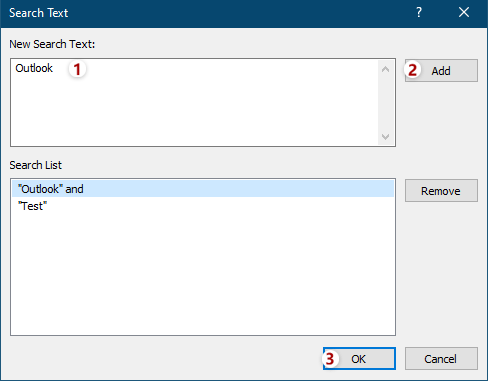
5. Nella finestra di dialogo Testo di ricerca, digita una parola o una frase nel campo Nuova parola chiave di ricerca, fai clic su Aggiungi e poi su OK. Suggerimento: Per aggiungere più parole di ricerca, inseriscile una alla volta e fai clic su “Aggiungi” per ciascuna prima di confermare con “OK”.
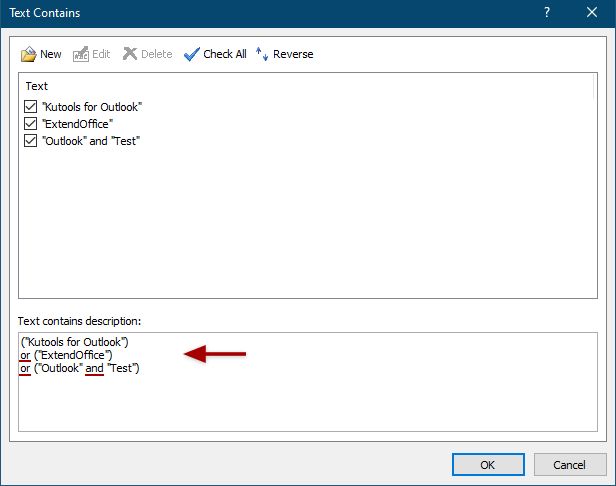
6. Tornati nella finestra di dialogo Testo contiene, potete continuare ad aggiungere altre parole in base alle vostre esigenze. Le parole inserite insieme in un unico campo seguono una logica “E” (devono essere tutte presenti), mentre quelle aggiunte separatamente tramite il pulsante Nuovo seguono una logica “O” (ne basta una per attivare la regola). Fate clic su OK per salvare.
7. Tornare al riquadro Guida per le regole per specificare eventuali condizioni aggiuntive oppure fare semplicemente clic su Avanti per continuare, se non sono necessarie.
8. Nella schermata successiva della Guida per le regole, definisci eventuali eccezioni (opzionali) oppure procedi direttamente facendo clic su Avanti.
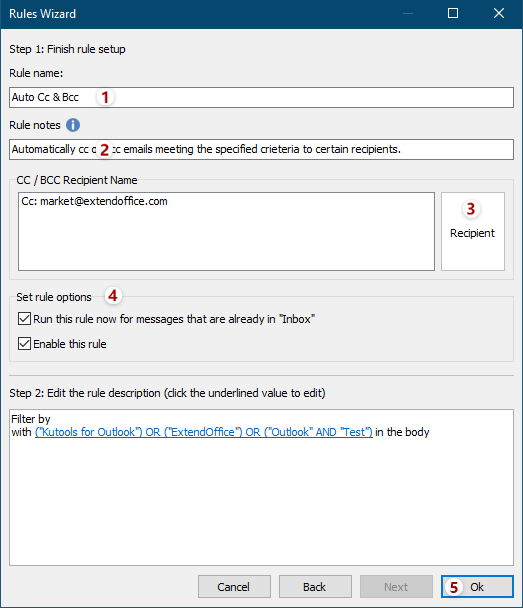
9. Nell’ultimo passaggio della Guida per le regole, inserisci un nome nella casella Nome regola per poterla riconoscere in seguito. Puoi anche aggiungere una descrizione nella casella Osservazioni sulla regola, impostare il destinatario Ccn facendo clic sul pulsante Destinatario e selezionare le opzioni desiderate per l’esecuzione della regola. Conferma la configurazione facendo clic su OK.
10. Assicurati che la nuova regola sia selezionata nella finestra CC/BCC automatico Manager, quindi fai clic su OK per chiudere la finestra di dialogo.
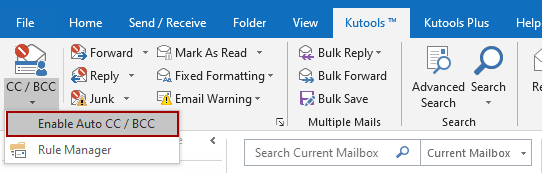
11. Infine, vai su Kutools > CC / CCN > Abilita nella barra multifunzione di Outlook per attivare la tua regola.
Conferma la tua scelta facendo clic su OK nella finestra di dialogo visualizzata.
Dopo aver completato questi passaggi, la tua regola CCN sarà attiva e ogni email conforme alle impostazioni definite invierà automaticamente una copia nascosta al destinatario (o ai destinatari) da te selezionato. Se hai configurato la regola per applicarsi sempre, il campo CCN verrà aggiunto in modo trasparente e automatico a tutti i messaggi in uscita, direttamente in background.
Vantaggi e suggerimenti aggiuntivi:
• L’interfaccia grafica ti permette di non dover scrivere neanche una riga di codice.
• Puoi creare più regole per esigenze diverse, ad esempio indirizzi CCN specifici per reparto o eccezioni basate su parole chiave o destinatari.
• Puoi impostare regole automatiche anche per il campo CC seguendo la stessa procedura.
• È possibile abilitare o disabilitare singole regole senza disinstallare la funzionalità.
• Le regole possono essere sospese deselezionandole nella Gestione Auto CC/BCC o disattivando la funzione dalla barra degli strumenti.
• Questa soluzione è ideale per chi cerca affidabilità e regole granulari basate su condizioni specifiche, ed è perfetta sia per i principianti che per ambienti aziendali con permessi limitati.
Nota:
(1) È possibile configurare regole automatiche sia per CC che per CCN utilizzando questa funzione.
(2) Puoi gestire più regole personalizzate e attivarle o disattivarle in base alle tue esigenze operative.
(3) Per disattivare temporaneamente tutte le regole, fai semplicemente clic su Abilita nella scheda Kutools; per disattivare regole specifiche, deseleziona i relativi nomi nella finestra di dialogo Gestione Auto CC/BCC.
Risoluzione dei problemi e best practice consigliate:
• Prima di fare affidamento sulle regole automatiche di CCN per corrispondenza importante, testale sempre accuratamente con informazioni non riservate.
• Se una regola non funziona come previsto — sia tramite VBA che con Kutools — assicurati che la funzionalità sia abilitata, che l’indirizzo del destinatario sia corretto e che la versione di Outlook supporti il metodo utilizzato.
• Tieni conto delle policy aziendali sulla privacy: inviare automaticamente copie di email sensibili, anche a te stesso, potrebbe non essere conforme alle normative interne sulla gestione dei dati di alcune organizzazioni.
• Evita di creare cicli infiniti (ad esempio, inserendo nel campo CCN un indirizzo che genera risposte automatiche), poiché potrebbero causare l’invio di email ripetute o superflue.
Articolo correlato:
Come impostare sempre il CC automatico a me stesso in Outlook?
Migliori strumenti per la produttività in Office
Scopri il nuovissimo Kutools per Outlook con 100+ funzionalità incredibili!Clicca per scaricare ora!
📧Automazione delle email: Risposta automatica (disponibile per POP e IMAP) / Invio email programmato / CC/BCC automatico in base a regole durante l’invio delle email / Inoltro automatico (regola avanzata) / Aggiunta automatica del saluto / Divisione automatica delle email con destinatari multipli in messaggi individuali...
📨Gestione delle email: Richiama Email / Blocca le email truffaldine in base all’oggetto e ad altri criteri / Elimina email duplicate / Ricerca avanzata / Organizza cartelle...
📁Allegati Pro: Salvataggio batch / Distacco batch / Compressione batch / Salvataggio automatico / Distacco automatico / Compressione automatica…
🌟Magia dell’interfaccia: 😊 Più emoji graziose e accattivanti / Ti avvisa all’arrivo di email importanti / Riduci a icona Outlook invece di chiuderlo...
👍Meraviglie con un clic: Rispondi a Tutti con Allegati / Email anti-phishing / 🕘 Mostra il fuso orario – Ora corrente del mittente...
👩🏼🤝👩🏻Contatti e calendario: Aggiungi contatti in blocco dalle email selezionate / Dividi un gruppo di contatti in gruppi individuali / Rimuovi i promemoria dei compleanni...
Usa Kutools nella tua lingua preferita: supporta inglese, spagnolo, tedesco, francese, cinese e oltre 40 altre lingue!


🚀 Download con un clic — Ottieni tutti i componenti aggiuntivi per Office
Fortemente consigliato: Kutools for Office (5-in-1)
Un clic per scaricare cinque programmi di installazionetutti insieme —Kutools per Excel, Outlook, Word, PowerPointe Office Tab Pro.Clicca per scaricare ora!
- ✅Comodità con un solo clic: scarica tutti e cinque i pacchetti di installazione in un’unica azione.
- 🚀Pronto per qualsiasi attività in Office: installa i componenti aggiuntivi che ti servono, esattamente quando ti servono.
- 🧰Inclusi: Kutools per Excel / Kutools per Outlook / Kutools per Word / Office Tab Pro / Kutools for PowerPoint