Outlook: modifica la cartella in cui vengono archiviati gli Elementi inviati
In Outlook, i messaggi inviati vengono normalmente salvati automaticamente nella cartella **Elementi inviati**. Tuttavia, potresti trovare più organizzato ed efficiente archiviarli in una cartella diversa. Questa guida ti illustra semplici procedure per modificare la cartella predefinita **Elementi inviati**, permettendoti di reindirizzare facilmente i tuoi messaggi inviati verso cartelle alternative in Microsoft Outlook.
Modifica la cartella in cui vengono archiviati gli Elementi inviati durante la composizione
Modifica la cartella in cui tutti gli Elementi inviati vengono archiviati automaticamente
Modifica la cartella in cui vengono archiviati gli Elementi inviati durante la composizione
Quando componi un messaggio di posta elettronica, puoi specificare una cartella alternativa in cui archiviarlo dopo l’invio.
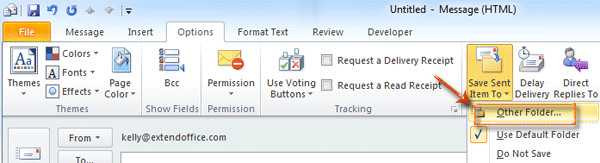
Passaggio 1: Fai clic su Salva elemento inviato in > Altra cartella nel gruppo Altre opzioni nella scheda Opzioni della finestra del messaggio.
Passaggio 2: Nella finestra di dialogo Seleziona cartella, seleziona ed evidenzia una cartella nella casella Cartelle: e fai clic sul pulsante OK.
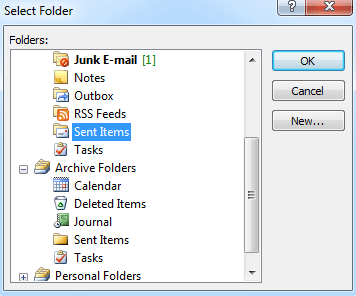
Dopo aver inviato questo messaggio, una copia verrà archiviata automaticamente nella cartella selezionata al Passaggio 2.
Assistente email IA in Outlook: risposte più intelligenti, comunicazione più chiara (magia con un clic!)
Ottimizza le tue attività quotidiane in Outlook con l’Assistente email IA di Kutools per Outlook: uno strumento potente che impara dalle tue email precedenti per suggerirti risposte intelligenti e precise, ottimizzare il contenuto dei messaggi e aiutarti a scrivere e perfezionare le tue email in modo rapido e senza sforzo.

Questa funzionalità supporta:
- Risposte intelligenti: ottieni risposte generate dalle tue conversazioni precedenti—personalizzate, precise e pronte all’uso.
- Contenuto migliorato: affina automaticamente il testo delle tue email per renderlo più chiaro ed efficace.
- Composizione senza sforzo: inserisci solo alcune parole chiave e lascia che l’IA si occupi del resto, con più stili di scrittura.
- Estensioni intelligenti: amplia i tuoi pensieri con suggerimenti contestuali.
- Sintesi: ottieni subito una panoramica rapida e concisa delle email più lunghe.
- Portata globale: traduci le tue email in qualsiasi lingua con estrema facilità.
Questa funzionalità supporta:
- Risposte email intelligenti
- Contenuto ottimizzato
- Bozze basate su parole chiave
- Estensione intelligente del contenuto
- Sintesi delle email
- Traduzione multilingue
Non aspettare—scarica subito l’Assistente email IA e approfitta di!
Modifica la cartella in cui tutti gli Elementi inviati vengono archiviati automaticamente
In alcuni casi, potresti voler modificare la cartella predefinita per gli elementi inviati, in modo che tutti i messaggi vengano archiviati automaticamente in una cartella specifica. Ti guideremo passo passo nella creazione di una regola in Outlook per ottenere questo risultato.
Prima di creare una regola, passa alla visualizzazione Posta facendo clic su Posta in Navigazione.
Passaggio 1: Apri la finestra di dialogo Regole e avvisi:
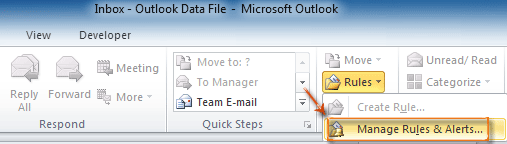
Fai clic su Regole > Gestisci regole e avvisi nel gruppo Sposta nella scheda Home.
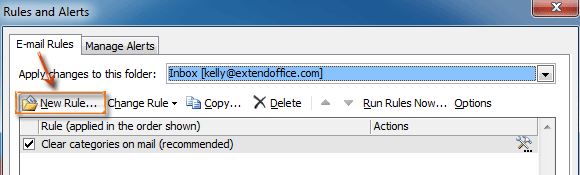
Passaggio 2: Nella finestra di dialogo Regole e avvisi, fai clic sul pulsante Nuova regola nella scheda Regole posta elettronica.
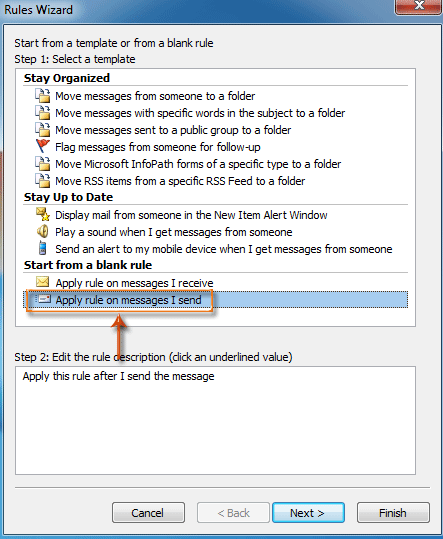
Passaggio 3: Nella finestra di dialogo Guida per le regole, seleziona e evidenzia Applica regola ai messaggi inviati da me nella sezione Crea una regola vuota e fai clic sul pulsante Avanti.
Passaggio 4: Nella nuova finestra di dialogo Guida per le regole,
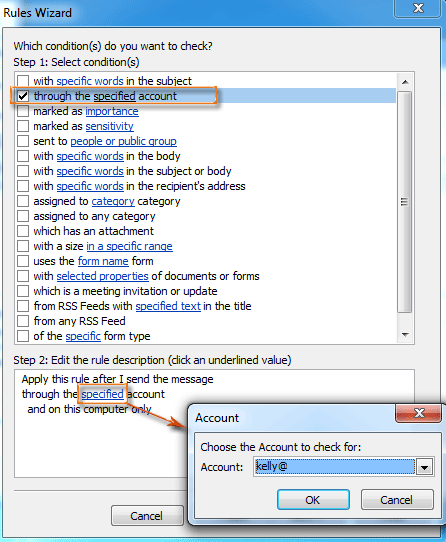
- Seleziona l'opzione Attraverso -Specifica- account nella sezione Passaggio 1: seleziona le condizioni.
- Fai clic su specificato nella sezione Passaggio 2: Modifica Contenuto regola.
- Nella finestra di dialogo Account visualizzata, seleziona un account nella casella Account: e fai clic sul pulsante OK.
- Fai clic sul pulsante Avanti.
Passaggio 5: Nella nuova finestra di dialogo Guida per le regole,
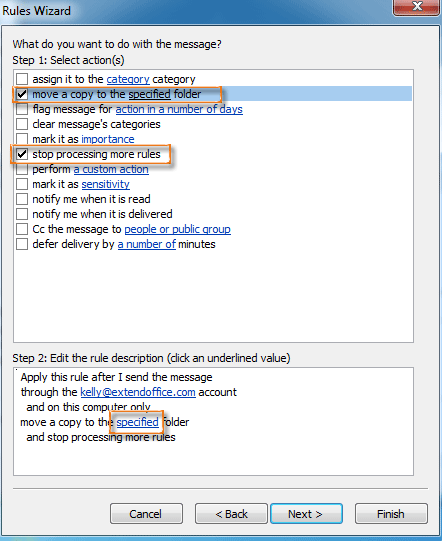
- Seleziona l'opzione sposta una copia nella cartella specificata e l'opzione interrompi l'elaborazione di ulteriori regole nella sezione Passaggio 1: seleziona le azioni.
- Fai clic su specificato nella sezione Passaggio 2: Modifica Contenuto regola.
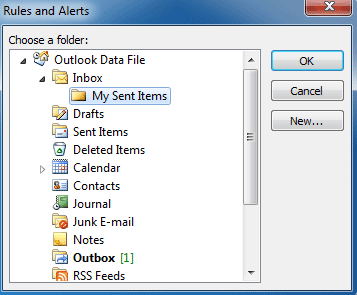
- Nella finestra di dialogo Regole e avvisi, seleziona una cartella e fai clic sul pulsante OK.
- Fai clic sul pulsante Avanti.
Passaggio 6: Continua a fare clic sui pulsanti Avanti e sul pulsante Fine nelle finestre di dialogo successive.
Da ora in poi, tutti i messaggi inviati verranno salvati automaticamente nella cartella impostata al Passaggio 5.
Migliori strumenti per la produttività in Office
Scopri il nuovissimo Kutools per Outlook con 100+ funzionalità incredibili!Clicca per scaricare ora!
📧Automazione delle email: Risposta automatica (disponibile per POP e IMAP) / Invio email programmato / CC/BCC automatico in base a regole durante l’invio delle email / Inoltro automatico (regola avanzata) / Aggiunta automatica del saluto / Divisione automatica delle email con destinatari multipli in messaggi individuali...
📨Gestione delle email: Richiama Email / Blocca le email truffaldine in base all’oggetto e ad altri criteri / Elimina email duplicate / Ricerca avanzata / Organizza cartelle...
📁Allegati Pro: Salvataggio batch / Distacco batch / Compressione batch / Salvataggio automatico / Distacco automatico / Compressione automatica…
🌟Magia dell’interfaccia: 😊 Più emoji graziose e accattivanti / Ti avvisa all’arrivo di email importanti / Riduci a icona Outlook invece di chiuderlo...
👍Meraviglie con un clic: Rispondi a Tutti con Allegati / Email anti-phishing / 🕘 Mostra il fuso orario – Ora corrente del mittente...
👩🏼🤝👩🏻Contatti e calendario: Aggiungi contatti in blocco dalle email selezionate / Dividi un gruppo di contatti in gruppi individuali / Rimuovi i promemoria dei compleanni...
Usa Kutools nella tua lingua preferita: supporta inglese, spagnolo, tedesco, francese, cinese e oltre 40 altre lingue!


🚀 Download con un clic — Ottieni tutti i componenti aggiuntivi per Office
Fortemente consigliato: Kutools for Office (5-in-1)
Un clic per scaricare cinque programmi di installazionetutti insieme —Kutools per Excel, Outlook, Word, PowerPointe Office Tab Pro.Clicca per scaricare ora!
- ✅Comodità con un solo clic: scarica tutti e cinque i pacchetti di installazione in un’unica azione.
- 🚀Pronto per qualsiasi attività in Office: installa i componenti aggiuntivi che ti servono, esattamente quando ti servono.
- 🧰Inclusi: Kutools per Excel / Kutools per Outlook / Kutools per Word / Office Tab Pro / Kutools for PowerPoint