Come rimuovere un account da Outlook mantenendo tutte le sue email?
Immagina di aver configurato più account di posta elettronica in Microsoft Outlook, ma di utilizzarne raramente alcuni. Potresti valutare la rimozione di questi account meno attivi. Di norma, eliminare un account di posta elettronica da Microsoft Outlook comporta anche la cancellazione delle relative email. Tuttavia, questo articolo ti illustrerà diverse tecniche per rimuovere un account di posta elettronica da Microsoft Outlook senza perdere i messaggi associati.
Rimuovi un account ma conserva le sue email salvando il file di dati originale
Questo metodo ti guiderà nella rimozione di un account di posta elettronica da Microsoft Outlook, mantenendo però tutti i suoi elementi all’interno dell’applicazione.
Nota importante: questa procedura è pensata per account di posta elettronica che utilizzano file di dati .pst. Se il tuo account utilizza file .ost, assicurati di convertirli ed esportarli come .pst prima di procedere. Questo passaggio è fondamentale per evitare la perdita di qualsiasi dato relativo alle email durante la rimozione dell'account.
- Apri la finestra di dialogo «Impostazioni account» facendo clic su «File» > «Info» > «Impostazioni account» > «Impostazioni account».

- Nella finestra di dialogo «Impostazioni account», nella scheda «Posta elettronica», segui questi passaggi:
- Seleziona l'account di posta elettronica che desideri rimuovere. Assicurati che l'account selezionato sia associato a un file di dati .pst. Se invece è collegato a un file .ost, la rimozione dell'account potrebbe comportare la perdita di tutte le email.
- Fai clic sul pulsante «Rimuovi».
- Fai clic sul pulsante «Chiudi» in basso per uscire dalla finestra di dialogo.

- Ora sei tornato all’interfaccia principale di Outlook. Fai clic su «File» > «Apri ed esporta» > «Apri file di dati di Outlook».
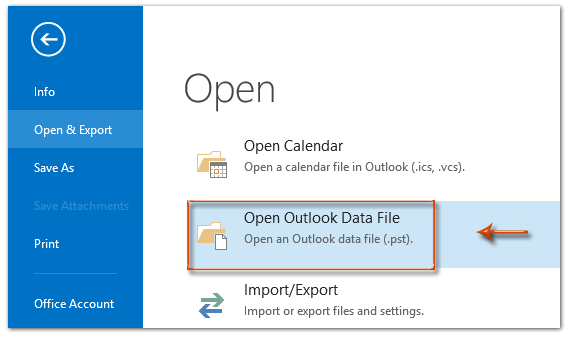
- Nella finestra popup «Apri file di dati di Outlook», individua il file di dati che desideri aprire, selezionalo e fai clic sul pulsante «Apri». Suggerimento: se il tuo file .pst si trova in una posizione non predefinita, naviga fino alla cartella specifica per aprirlo.


Risultato
L’account di posta elettronica è stato rimosso da Microsoft Outlook; tuttavia, le cartelle associate a tale account rimangono visibili e accessibili nella navigazione.
Assistente email IA in Outlook: risposte più intelligenti, comunicazione più chiara (magia con un clic!)
Ottimizza le tue attività quotidiane in Outlook con l’Assistente email IA di Kutools per Outlook: uno strumento potente che impara dalle tue email precedenti per suggerirti risposte intelligenti e precise, ottimizzare il contenuto dei messaggi e aiutarti a scrivere e perfezionare le tue email in modo rapido e senza sforzo.

Questa funzionalità supporta:
- Risposte intelligenti: ottieni risposte generate dalle tue conversazioni precedenti—personalizzate, precise e pronte all’uso.
- Contenuto migliorato: affina automaticamente il testo delle tue email per renderlo più chiaro ed efficace.
- Composizione senza sforzo: inserisci solo alcune parole chiave e lascia che l’IA si occupi del resto, con più stili di scrittura.
- Estensioni intelligenti: amplia i tuoi pensieri con suggerimenti contestuali.
- Sintesi: ottieni subito una panoramica rapida e concisa delle email più lunghe.
- Portata globale: traduci le tue email in qualsiasi lingua con estrema facilità.
Questa funzionalità supporta:
- Risposte email intelligenti
- Contenuto ottimizzato
- Bozze basate su parole chiave
- Estensione intelligente del contenuto
- Sintesi delle email
- Traduzione multilingue
Non aspettare—scarica subito l’Assistente email IA e approfitta di!
Rimuovi un account ma conserva le sue email tramite copia e incolla
In realtà, prima di rimuovere un account di posta elettronica da Microsoft Outlook, è possibile salvare tutte le sue email copiandole e incollandole manualmente in altre cartelle. Ecco una guida dettagliata per farlo:
- Apri nella Navigazione la cartella di posta elettronica associata all’account che intendi rimuovere e che contiene le email che desideri conservare.

- Premi «Ctrl + A» per selezionare tutte le email nella cartella Apri.
- Premi «Ctrl + C» per copiare questi messaggi email.
- Passa alla cartella in cui desideri spostare queste email. Nel mio esempio, aprirei la Posta in arrivo di un altro account di posta elettronica, come illustrato di seguito.

- Premi «Ctrl + V» per incollare tutti i messaggi di posta elettronica copiati in questa Apri cartella.Suggerimenti:
- Ripeti i passaggi da 1 a 5 per spostare i messaggi di posta elettronica dalle altre cartelle dell’account che stai rimuovendo.
- Questo metodo non include le sottocartelle. Per le email presenti nelle sottocartelle, dovrai ripetere i passaggi da 1 a 5 per ciascuna di esse.
- Apri la finestra di dialogo «Impostazioni account» facendo clic su «File» > «Info» > «Impostazioni account» > «Impostazioni account».
- Nella finestra di dialogo «Impostazioni account», nella scheda «Posta elettronica», segui questi passaggi:
- Seleziona l'account email che desideri rimuovere.
- Fai clic sul pulsante «Rimuovi».
- Fai clic sul pulsante «Chiudi» in basso per uscire dalla finestra di dialogo.


Esporta le email in un file PST prima della rimozione dell’account
Per conservare le email di un account che stai rimuovendo da Outlook, esportarle come file PST (file di dati di Outlook) è un metodo affidabile. Questa procedura crea un backup delle tue email, a cui potrai accedere anche dopo aver rimosso l’account. Ecco come fare:
- Apri la finestra di dialogo «Procedura guidata Importa/Esporta» selezionando «File» > «Apri ed Esporta» > «Importa/Esporta».
- Nella procedura guidata, seleziona «Esporta in un file» e clicca su «Avanti».

- Nella finestra di dialogo «Esporta in un file», seleziona «File di dati di Outlook (.pst)» e poi fai clic su «Avanti».

- Nella finestra di dialogo «Esporta file di dati di Outlook», seleziona l’account di posta elettronica che rimuoverai in seguito per esportarne i dati, assicurati che l’opzione «Includi sottocartelle» sia attivata e fai clic su «Avanti».

- Imposta i parametri di esportazione come segue:
- Fai clic su «Sfoglia», seleziona una cartella in cui salvare il file PST e assegnagli un nome.
- Seleziona l’opzione «Non esportare gli elementi duplicati».
- Fai clic su «Fine».

- Verrà visualizzata la finestra di dialogo «Crea file di dati di Outlook»:
- Per aggiungere una password, inseriscila sia nel campo «Password» che in «Conferma password», quindi fai clic su «OK».
- Per saltare l'aggiunta di una password, clicca su «Annulla».


Dopo aver completato questi passaggi, puoi procedere con la procedura descritta nel primo metodo per eliminare un account di posta elettronica esistente conservando le email originali.
Migliori strumenti per la produttività in Office
Scopri il nuovissimo Kutools per Outlook con 100+ funzionalità incredibili!Clicca per scaricare ora!
📧Automazione delle email: Risposta automatica (disponibile per POP e IMAP) / Invio email programmato / CC/BCC automatico in base a regole durante l’invio delle email / Inoltro automatico (regola avanzata) / Aggiunta automatica del saluto / Divisione automatica delle email con destinatari multipli in messaggi individuali...
📨Gestione delle email: Richiama Email / Blocca le email truffaldine in base all’oggetto e ad altri criteri / Elimina email duplicate / Ricerca avanzata / Organizza cartelle...
📁Allegati Pro: Salvataggio batch / Distacco batch / Compressione batch / Salvataggio automatico / Distacco automatico / Compressione automatica…
🌟Magia dell’interfaccia: 😊 Più emoji graziose e accattivanti / Ti avvisa all’arrivo di email importanti / Riduci a icona Outlook invece di chiuderlo...
👍Meraviglie con un clic: Rispondi a Tutti con Allegati / Email anti-phishing / 🕘 Mostra il fuso orario – Ora corrente del mittente...
👩🏼🤝👩🏻Contatti e calendario: Aggiungi contatti in blocco dalle email selezionate / Dividi un gruppo di contatti in gruppi individuali / Rimuovi i promemoria dei compleanni...
Usa Kutools nella tua lingua preferita: supporta inglese, spagnolo, tedesco, francese, cinese e oltre 40 altre lingue!


🚀 Download con un clic — Ottieni tutti i componenti aggiuntivi per Office
Fortemente consigliato: Kutools for Office (5-in-1)
Un clic per scaricare cinque programmi di installazionetutti insieme —Kutools per Excel, Outlook, Word, PowerPointe Office Tab Pro.Clicca per scaricare ora!
- ✅Comodità con un solo clic: scarica tutti e cinque i pacchetti di installazione in un’unica azione.
- 🚀Pronto per qualsiasi attività in Office: installa i componenti aggiuntivi che ti servono, esattamente quando ti servono.
- 🧰Inclusi: Kutools per Excel / Kutools per Outlook / Kutools per Word / Office Tab Pro / Kutools for PowerPoint