Come si invia un aggiornamento della riunione a un solo partecipante (nuovo) in Outlook?
Immagina di aver inviato un invito a una riunione tramite Outlook a numerosi partecipanti e di aver aggiornato la pianificazione dell’incontro registrando il processo di organizzazione. Ora devi inviare tale aggiornamento soltanto al tuo responsabile: come puoi farlo? In realtà, Microsoft Outlook ti permette di inviare aggiornamenti della riunione a un singolo partecipante o a un nuovo invitato.
Per inviare aggiornamenti della riunione a un solo partecipante in Microsoft Outlook, procedi come segue:
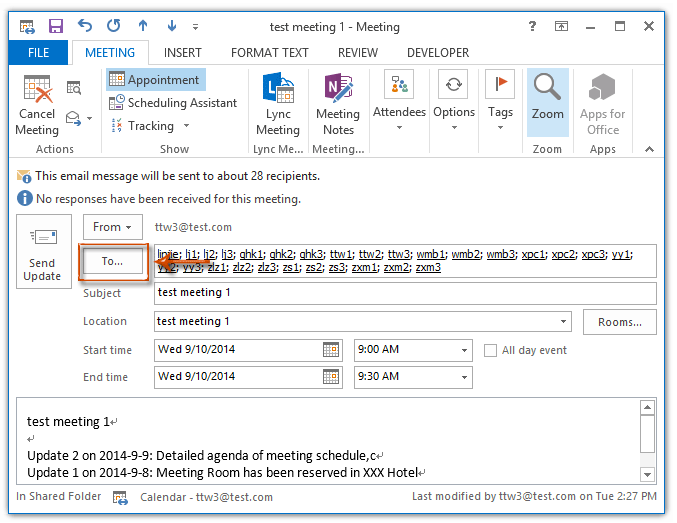
Passo 1. Passa alla visualizzazione «Calendario», apri la riunione a cui desideri inviare un aggiornamento ed effettua le modifiche necessarie.
Passo 2. Nella finestra della riunione, fai clic sul pulsante «Invia aggiornamento».
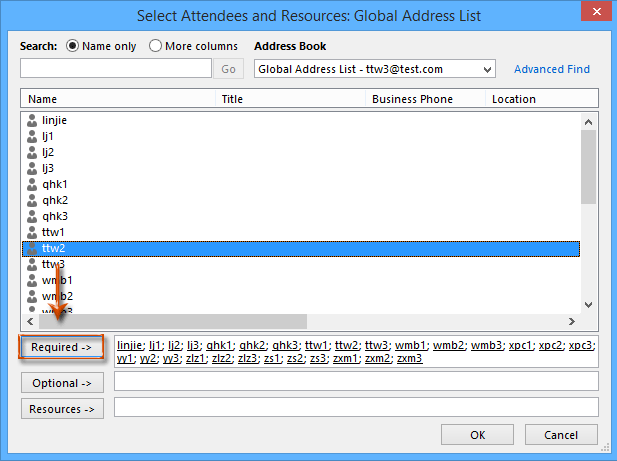
Passo 3. Nella finestra di dialogo «Seleziona partecipanti e risorse» che si apre, individua e seleziona il partecipante a cui desideri inviare l’aggiornamento, fai clic sul pulsante «Obbligatorio ->» e poi su «OK».
Nota: Se ricordi chiaramente l’indirizzo email del partecipante, puoi saltare il Passo 2 e il Passo 3 e inserire direttamente l’indirizzo email nel campo «A».
Passo 4. Tornato nella finestra della riunione, fai clic sul pulsante «Invia aggiornamento».
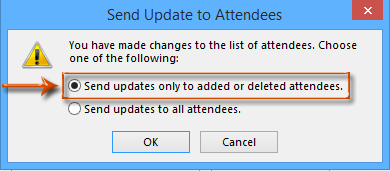
Passo 5. Nella finestra di dialogo «Invia aggiornamento ai partecipanti» che appare, seleziona l’opzione «Invia aggiornamenti solo ai partecipanti aggiunti o eliminati» e fai clic su «OK».
Nota: Anche se il nuovo partecipante fosse già incluso nell’invito originale, eventuali duplicati verranno rimossi automaticamente dopo l’invio dell’aggiornamento.
Migliori strumenti per la produttività in Office
Scopri il nuovissimo Kutools per Outlook con 100+ funzionalità incredibili!Clicca per scaricare ora!
📧Automazione delle email: Risposta automatica (disponibile per POP e IMAP) / Invio email programmato / CC/BCC automatico in base a regole durante l’invio delle email / Inoltro automatico (regola avanzata) / Aggiunta automatica del saluto / Divisione automatica delle email con destinatari multipli in messaggi individuali...
📨Gestione delle email: Richiama Email / Blocca le email truffaldine in base all’oggetto e ad altri criteri / Elimina email duplicate / Ricerca avanzata / Organizza cartelle...
📁Allegati Pro: Salvataggio batch / Distacco batch / Compressione batch / Salvataggio automatico / Distacco automatico / Compressione automatica…
🌟Magia dell’interfaccia: 😊 Più emoji graziose e accattivanti / Ti avvisa all’arrivo di email importanti / Riduci a icona Outlook invece di chiuderlo...
👍Meraviglie con un clic: Rispondi a Tutti con Allegati / Email anti-phishing / 🕘 Mostra il fuso orario – Ora corrente del mittente...
👩🏼🤝👩🏻Contatti e calendario: Aggiungi contatti in blocco dalle email selezionate / Dividi un gruppo di contatti in gruppi individuali / Rimuovi i promemoria dei compleanni...
Usa Kutools nella tua lingua preferita: supporta inglese, spagnolo, tedesco, francese, cinese e oltre 40 altre lingue!


🚀 Download con un clic — Ottieni tutti i componenti aggiuntivi per Office
Fortemente consigliato: Kutools for Office (5-in-1)
Un clic per scaricare cinque programmi di installazionetutti insieme —Kutools per Excel, Outlook, Word, PowerPointe Office Tab Pro.Clicca per scaricare ora!
- ✅Comodità con un solo clic: scarica tutti e cinque i pacchetti di installazione in un’unica azione.
- 🚀Pronto per qualsiasi attività in Office: installa i componenti aggiuntivi che ti servono, esattamente quando ti servono.
- 🧰Inclusi: Kutools per Excel / Kutools per Outlook / Kutools per Word / Office Tab Pro / Kutools for PowerPoint