Come mostrare gli appuntamenti come Libero/Occupato/Provvisorio per impostazione predefinita in Outlook?
Normalmente, i nuovi appuntamenti vengono visualizzati come occupati per impostazione predefinita in Outlook. Tuttavia, in alcuni casi, potrebbe essere necessario creare frequentemente appuntamenti che mostrano il tempo come libero o provvisorio. Come si possono mostrare gli appuntamenti come liberi/occupati/provvisori per impostazione predefinita in Outlook? Questo articolo ti presenterà una soluzione.
Mostra gli appuntamenti come Libero/Occupato/Provvisorio per impostazione predefinita in Outlook
Mostra gli appuntamenti come Libero/Occupato/Provvisorio per impostazione predefinita in Outlook
Per mostrare i nuovi appuntamenti come liberi/occupati/provvisori per impostazione predefinita in Outlook, è necessario creare un modulo di appuntamento che mostri il tempo come libero/occupato/provvisorio e quindi sostituire il modulo di appuntamento predefinito nel tuo Outlook.
1. Apri il calendario specificato e fai clic su Home > Nuovo Appuntamento per creare un nuovo appuntamento.
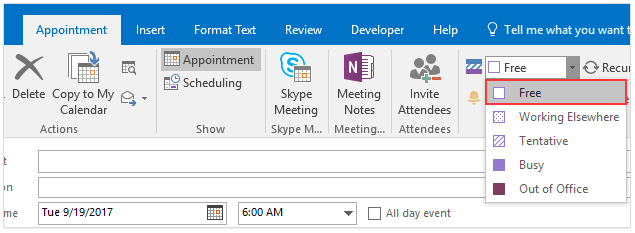
2. Nella nuova finestra dell'appuntamento, specifica Libero (Lavoro altrove, Provvisorio, Occupato o Fuori sede, a seconda delle tue esigenze) dall'elenco a discesa Mostra come nella scheda Appuntamento. Vedi screenshot:

3. Procedi facendo clic su Sviluppatore > Progetta questo modulo. Vedi screenshot:
Nota: Clicca per vedere come aggiungere la scheda Sviluppatore sulla Barra multifunzione in Outlook.

4. Fai clic su Sviluppatore > Pubblica > Pubblica modulo. Vedi screenshot:

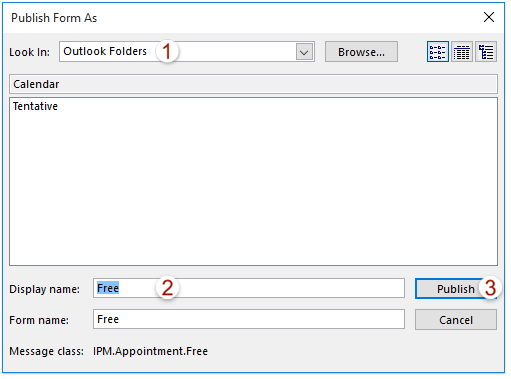
5. Nella finestra di dialogo Pubblica modulo come, assicurati che Cartelle di Outlook sia selezionato nell'elenco a discesa Cerca in, digita l'opzione Mostra tempo come hai specificato (Libero nel mio esempio) nella casella Nome visualizzato e poi fai clic sul pulsante Pubblica. Vedi screenshot:

6. Chiudi il nuovo appuntamento senza salvare.
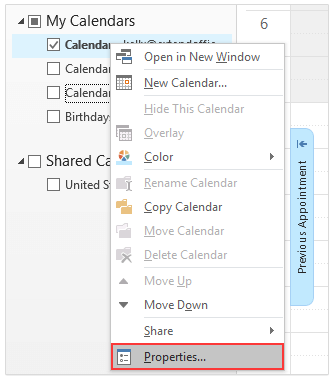
7. Ora sei tornato al Calendario, fai clic con il tasto destro del mouse sul calendario aperto specificato e seleziona Proprietà dal menu contestuale. Vedi screenshot:

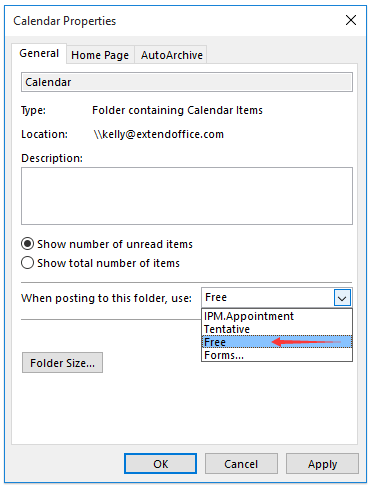
8. Nella finestra di dialogo Proprietà del Calendario, seleziona il nuovo modulo (Libero nel mio esempio) dall'elenco a discesa Quando si pubblica in questa cartella, usa: e fai clic sul pulsante OK per salvare la modifica. Vedi screenshot:

Ora vedrai che il pulsante Nuovo Appuntamento è stato sostituito con il pulsante Nuovo Libero (o un altro nome a seconda del nome del modulo specificato nel Passaggio 5), come mostrato nello screenshot sottostante. Facendo clic sul pulsante Nuovo Libero verrà creato automaticamente un nuovo appuntamento che mostra il tempo come libero.

Assistente AI per la Posta in Outlook: Risposte più intelligenti, comunicazione più chiara (magia con un clic!) GRATIS
Semplifica le tue attività quotidiane di Outlook con l'Assistente AI per la Posta di Kutools per Outlook. Questo potente strumento impara dalle tue email precedenti per offrire risposte intelligenti e accurate, ottimizzare il contenuto delle tue email e aiutarti a redigere e perfezionare i messaggi senza sforzo.

Questa funzione supporta:
- Risposte Intelligenti: Ottieni risposte create a partire dalle tue conversazioni passate—personalizzate, precise e pronte all'uso.
- Contenuto Migliorato: Perfeziona automaticamente il testo delle tue email per chiarezza e impatto.
- Composizione Senza Sforzo: Fornisci solo delle parole chiave e lascia che l'IA si occupi del resto, con diversi stili di scrittura.
- Estensioni Intelligenti: Espandi i tuoi pensieri con suggerimenti contestuali.
- Riassunti: Ottieni sintesi concise di email lunghe istantaneamente.
- Portata Globale: Traduci le tue email in qualsiasi lingua con facilità.
Questa funzione supporta:
- Risposte intelligenti alle email
- Contenuto ottimizzato
- Bozze basate su parole chiave
- Estensione intelligente del contenuto
- Riassunto delle email
- Traduzione multilingue
Il meglio di tutto è che questa funzione è completamente gratuita per sempre! Non aspettare—scarica subito Assistente AI per la Posta e goditela
Articoli correlati
I migliori strumenti per la produttività in Office
Ultime notizie: Kutools per Outlook lancia la versione gratuita!
Scopri il nuovissimo Kutools per Outlook con oltre100 funzionalità straordinarie! Clicca per scaricare ora!
📧 Automazione Email: Risposta automatica (disponibile per POP e IMAP) / Programma invio Email / CC/BCC automatico tramite Regola durante l’invio delle Email / Inoltro automatico (Regola avanzata) / Aggiungi Saluto automaticamente / Dividi automaticamente Email multi-destinatario in messaggi singoli ...
📨 Gestione Email: Richiama Email / Blocca Email fraudulent (tramite Oggetto e altri parametri) / Elimina Email Duplicato / Ricerca Avanzata / Organizza cartelle ...
📁 Allegati Pro: Salva in Batch / Distacca in Batch / Comprimi in Batch / Salvataggio automatico / Distacca automaticamente / Auto Comprimi ...
🌟 Magia Interfaccia: 😊Più emoji belle e divertenti / Notifiche per le email importanti in arrivo / Riduci Outlook al posto di chiuderlo ...
👍 Funzioni rapide: Rispondi a Tutti con Allegati / Email Anti-Phishing / 🕘Mostra il fuso orario del mittente ...
👩🏼🤝👩🏻 Contatti & Calendario: Aggiungi in Batch contatti dalle Email selezionate / Dividi un Gruppo di Contatti in Gruppi singoli / Rimuovi promemoria di compleanno ...
Utilizza Kutools nella lingua che preferisci – supporta Inglese, Spagnolo, Tedesco, Francese, Cinese e oltre40 altre!


🚀 Download con un solo clic — Ottieni tutti gli Add-in per Office
Consigliato: Kutools per Office (5-in-1)
Un solo clic per scaricare cinque installatori contemporaneamente — Kutools per Excel, Outlook, Word, PowerPoint e Office Tab Pro. Clicca per scaricare ora!
- ✅ Comodità con un solo clic: scarica tutti e cinque i pacchetti di installazione in una sola azione.
- 🚀 Pronto per qualsiasi attività Office: installa i componenti aggiuntivi necessari, quando ti servono.
- 🧰 Inclusi: Kutools per Excel / Kutools per Outlook / Kutools per Word / Office Tab Pro / Kutools per PowerPoint