Come creare promemoria di Outlook direttamente da un foglio di calcolo Excel?
Questo articolo spiega come creare promemoria di Outlook direttamente dai dati presenti in un foglio di calcolo Excel.
Creare promemoria di Outlook da un foglio di calcolo Excel con codice VBA
Creare promemoria di Outlook da un foglio di calcolo Excel con codice VBA
Per creare promemoria di Outlook direttamente da Excel, segui questi semplici passaggi.
1. Crea un foglio di lavoro con le intestazioni di colonna e i relativi campi per il promemoria, come illustrato nello screenshot seguente.

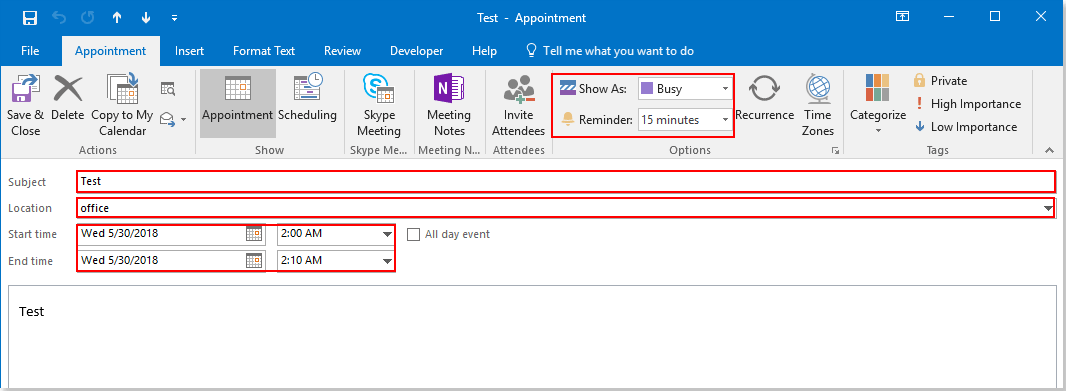
Nota: nella colonna «Stato occupazione», il numero "2" indica che il promemoria verrà visualizzato come «Occupato» nel tuo calendario di Outlook. Puoi modificarlo in base alle tue esigenze scegliendo tra "1 (Provvisorio)", "3 (Fuori sede)", "4 (Lavoro altrove)" o "5 (Libero)".
2. Premi i tasti «Alt» + "F11" per aprire la finestra di Microsoft Visual Basic, Applications Edition.
3. Nella finestra «Microsoft Visual Basic, Applications Edition», fai clic su «Inserisci» > «Modulo», quindi copia il seguente codice VBA nella finestra del codice.
Codice VBA: crea promemoria di Outlook da un foglio di calcolo Excel
Sub AddAppointments()
'Update by Extendoffice 20180608
    Dim I As Long
    Dim xRg As Range
    Dim xOutApp As Object
    Dim xOutItem As Object
    Set xOutApp = CreateObject("Outlook.Application")
    Set xRg = Range("A2:G2")
    For I = 1 To xRg.Rows.Count
        Set xOutItem = xOutApp.CreateItem(1)
        Debug.Print xRg.Cells(I, 1).Value
        xOutItem.Subject = xRg.Cells(I, 1).Value
        xOutItem.Location = xRg.Cells(I, 2).Value
        xOutItem.Start = xRg.Cells(I, 3).Value
        xOutItem.Duration = xRg.Cells(I, 4).Value
        If Trim(xRg.Cells(I, 5).Value) = "" Then
            xOutItem.BusyStatus = 2
        Else
            xOutItem.BusyStatus = xRg.Cells(I, 5).Value
        End If
        If xRg.Cells(I, 6).Value > 0 Then
            xOutItem.ReminderSet = True
            xOutItem.ReminderMinutesBeforeStart = xRg.Cells(I, 6).Value
        Else
            xOutItem.ReminderSet = False
        End If
        xOutItem.Body = xRg.Cells(I, 7).Value
        xOutItem.Save
        Set xOutItem = Nothing
    Next
    Set xOutApp = Nothing
End Sub
Nota: Nel codice riportato sopra, "A2:G2" è l'intervallo dati in base al quale desideri creare gli appuntamenti.
4. Premi "F5" o fai clic sul pulsante «Esegui» per avviare il codice: tutti gli appuntamenti con i campi specificati verranno aggiunti contemporaneamente al tuo calendario di Outlook.
Potrai quindi aprire il Calendario di Outlook per visualizzare i risultati. Vedi lo screenshot:
Migliori strumenti per la produttività in Office
Scopri il nuovissimo Kutools per Outlook con 100+ funzionalità incredibili!Clicca per scaricare ora!
📧Automazione delle email: Risposta automatica (disponibile per POP e IMAP) / Invio email programmato / CC/BCC automatico in base a regole durante l’invio delle email / Inoltro automatico (regola avanzata) / Aggiunta automatica del saluto / Divisione automatica delle email con destinatari multipli in messaggi individuali...
📨Gestione delle email: Richiama Email / Blocca le email truffaldine in base all’oggetto e ad altri criteri / Elimina email duplicate / Ricerca avanzata / Organizza cartelle...
📁Allegati Pro: Salvataggio batch / Distacco batch / Compressione batch / Salvataggio automatico / Distacco automatico / Compressione automatica…
🌟Magia dell’interfaccia: 😊 Più emoji graziose e accattivanti / Ti avvisa all’arrivo di email importanti / Riduci a icona Outlook invece di chiuderlo...
👍Meraviglie con un clic: Rispondi a Tutti con Allegati / Email anti-phishing / 🕘 Mostra il fuso orario – Ora corrente del mittente...
👩🏼🤝👩🏻Contatti e calendario: Aggiungi contatti in blocco dalle email selezionate / Dividi un gruppo di contatti in gruppi individuali / Rimuovi i promemoria dei compleanni...
Usa Kutools nella tua lingua preferita: supporta inglese, spagnolo, tedesco, francese, cinese e oltre 40 altre lingue!


🚀 Download con un clic — Ottieni tutti i componenti aggiuntivi per Office
Fortemente consigliato: Kutools for Office (5-in-1)
Un clic per scaricare cinque programmi di installazionetutti insieme —Kutools per Excel, Outlook, Word, PowerPointe Office Tab Pro.Clicca per scaricare ora!
- ✅Comodità con un solo clic: scarica tutti e cinque i pacchetti di installazione in un’unica azione.
- 🚀Pronto per qualsiasi attività in Office: installa i componenti aggiuntivi che ti servono, esattamente quando ti servono.
- 🧰Inclusi: Kutools per Excel / Kutools per Outlook / Kutools per Word / Office Tab Pro / Kutools for PowerPoint