Come visualizzare o nascondere i limiti del testo in Word?
Gli utenti di Microsoft Word possono visualizzare con precisione i limiti del proprio documento grazie all’opzione **Mostra limiti del testo**, per comprendere al meglio il layout e la struttura del contenuto.
Che tu voglia visualizzare i limiti del testo per una modifica precisa o nasconderli per una visualizzazione più pulita, questa guida ti mostra come mostrare o nascondere rapidamente i Limiti del Testo in Word.
Strumenti di produttività consigliati per Word
Kutools per Word: Integrazione dell’IA 🤖, oltre 100 funzionalità avanzate risparmiano 50 % del tempo dedicato alla gestione dei documenti.Scarica gratuitamente
Office Tab: Introduce le schede simili a quelle del browser in Word (e negli altri strumenti Office), semplificando la navigazione tra più documenti.Scarica gratuitamente
Visualizzare o nascondere Limiti del Testo tramite Opzioni di Word
- Fai clic sulla scheda File, quindi su Opzioni.
- Nella finestra Opzioni di Word, fare clic su Avanzate, quindi selezionare Mostra Limiti del Testoin corrispondenza di Mostra Contenuto del Documentoper visualizzare Limiti del Testo nel documento oppure deselezionarla per nasconderli.


Office Tab
Navigazione a schede per Word, Excel, PowerPoint e molto altro – proprio come in un browser web, con passaggio fluido tra i documenti in un’unica finestra.
Visualizzare o nascondere Limiti del Testo in Word utilizzando Kutools
Kutools per Word offre agli utenti un modo semplice per visualizzare o nascondere i limiti del testo e altri elementi del documento in Word. Riunendo tutte le impostazioni di visualizzazione in un’unica posizione, Kutools consente di mostrare o nascondere rapidamente i limiti del testo e gli altri segni di formattazione, senza dover cercare tra i vari menu di Word.
Kutools per Word
Kutools per Word ti permette di gestire più rapidamente le attività quotidiane sui documenti grazie a strumenti pratici integrati direttamente in Microsoft Word—senza codifica e senza configurazioni complesse.
- Scrittura, perfezionamento, traduzione e sintesi con intelligenza artificiale
- Trova e sostituisci in batch tra i documenti
- Unisci e dividi facilmente documenti di Word
- Conversione batch da Word a PDF e viceversa
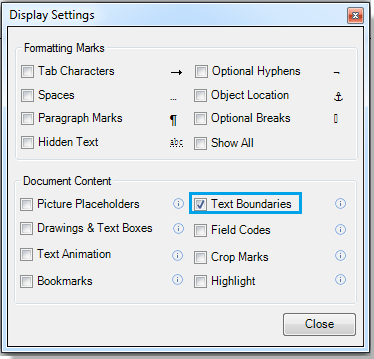
Fai clic su KUTOOLS PLUS > Impostazioni di Visualizzazione.
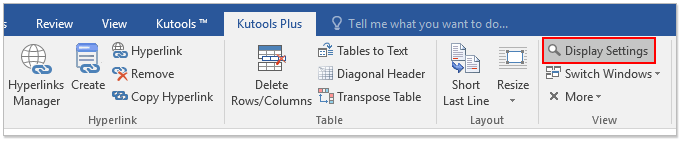
Seleziona o deseleziona la casella di controllo Limiti del Testo nella finestra di dialogo Impostazioni di Visualizzazione per visualizzare o nascondere i limiti del testo.


È possibile osservare il risultato come illustrato di seguito:
 |
 |
 |
Per ulteriori informazioni su questa funzionalità, visita:Mostra/nascondi rapidamente o attiva/disattiva i segni di formattazione (segni di paragrafo e testo nascosto) in Word.
Articoli correlati:
- Visualizzare o nascondere Limiti del Testo in Word
- Visualizzare la scheda Sviluppo/Barra multifunzione in Word
- Visualizzare i caratteri senza larghezza Interruzioni Opzionali in Word
Migliori strumenti per la produttività in Office
Kutools per Word – Migliora la tua esperienza con Word grazie a oltre 100 funzionalità eccezionali!
🤖Funzionalità KUTOOLS AI: Assistente AI / Assistente in Tempo Reale / Super Lucida (Mantieni formato) / Super Traduci (Mantieni formato) / Redazione AI / Correzione AI…
📘Padronanza dei documenti: Dividi pagine, unisci documenti, esporta la selezione in vari formati (PDF, TXT, DOC, HTML…) e conversione batch in PDF…
✏Modifica contenuti: Trova e sostituisci in batch su più file / Ridimensiona tutte le immagini / Trasponi righe e colonne della tabella / Converti tabella in testo…
🧹Pulizia senza sforzo: Elimina in un attimo spazi extra, interruzioni di sezione, caselle di testo e collegamenti ipertestuali. Per altri strumenti di rimozione, vai al gruppo Rimuovi…
➕Inserimenti creativi: Inserisci separatori delle migliaia, caselle di controllo, pulsanti di opzione, codici QR, codici a barre e immagini multiple. Scopri di più nel gruppo Inserisci…
🔍Selezioni precise: Individua con precisione pagine specifiche, tabelle, forme, paragrafi di intestazione e migliora la navigazione con altre funzionalità ...Seleziona...
⭐Miglioramenti stellari: Passa a qualsiasi posizione / Inserimento automatico di testo ripetitivo / Alterna tra i documenti Windows / 11 strumenti di conversione Strumenti di...
🌍Supporta oltre 40 lingue: Usa Kutools nella tua lingua preferita – tra cui inglese, spagnolo, tedesco, francese, cinese e molte altre!

Office Tab- Porta l'interfaccia a schede in Office e rende il tuo lavoro molto più semplice
- Abilita la modifica e la lettura a schede in Word, Excel, PowerPoint, Publisher, Access, Visio e Project.
- Apri e crea più documenti in nuove schede della stessa finestra, anziché in nuove finestre.
- Aumenta la tua produttività del 50 % e riduci centinaia di clic del mouse ogni giorno!
✨ Kutools for Office – Un’installazione, cinque strumenti potenti!
Include Office Tab Pro·Kutools per Excel·Kutools per Outlook·Kutools per Word·Kutools for PowerPoint
📦 Ottieni tutti gli 5 strumenti in un’unica suite | 🔗 Integrazione perfetta con Microsoft Office | ⚡ Risparmia tempo e aumenta immediatamente la produttività
Migliori strumenti per la produttività in Office
Kutools per Word- Strumenti 100+ per Word
- 🤖KUTOOLS AI Funzionalità:Assistente AI/Assistente in Tempo Reale/Super Lucida/Super Traduci/Redazione AI/Correzione AI
- 📘Padronanza dei documenti:Dividi pagine/Unisci Documenti/Conversione batch in PDF
- ✏Modifica contenuti:Trova e sostituisci in batch/Ridimensiona tutte le immagini
- 🧹Pulizia senza sforzo:Rimuovi spazi extra/Rimuovi Interruzione di sezione
- ➕Inserimenti creativi:Inserisci separatori delle migliaia/Inserisci Casella di Controllo/Crea Codice QR
- 🌍Supporta oltre 40 lingue: Kutools parla la tua lingua – sono supportate oltre 40 lingue!